|
AccuPOS
Retail Setup Guide Peachtree
2005 or higher Pro and Premier Part 1 Peachtree Company Setup In order to
use AccuPOS Retail and have it update Peachtree for inventory and accounting
purposes, we ask that you setup your Peachtree Company file first. If you are
installing Peachtree for the first time, please consult Peachtree customer
support with questions pertaining to accounting issues. This manual and
AccuPOS Retail support staff will only support issues that are required for
AccuPOS Retail to operate properly. 1.
Sales tax
Authorities and Code Using the Peachtree tax
Authorities and Tax Codes, create the sales tax that will be applied at the
Point Of Later you will have to create the
exact same tax authorities in AccuPOS so they can be used at the Point Of 1.
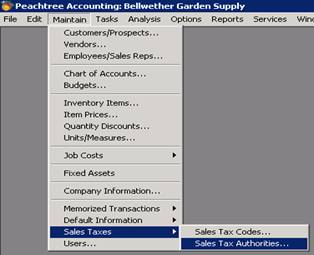
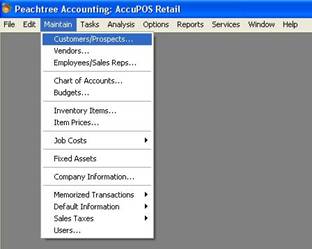
In Peachtree,
click on Maintain>> Sales Taxes>> Sales Tax Authorities 2.
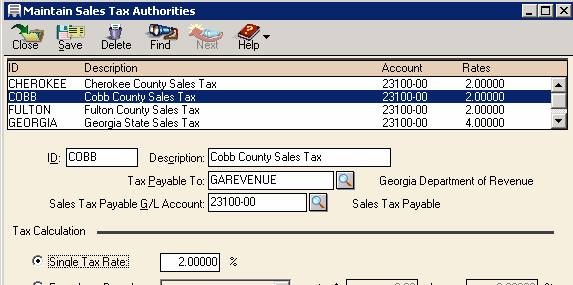
Enter the
information for the Sales Tax Authority. 3.
Enter the
description, vendor and GL account for this tax Authority. 4.
Choose “Single
Tax Rate” and enter the tax rate for this Authority.
5.
Click Save. 6.
Repeat these
steps for all Authorities using a different ID for each one. Important:
Peachtree is cap sensitive. It is important that the Tax Authority name is created
using all caps. 2.
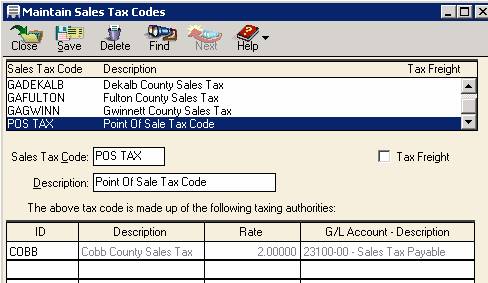
Create “POS
TAX” tax code Now that you have setup Tax
Authorities, create a Tax Code that will combine these taxing authorities.
Later you will have to create the exact same tax code in AccuPOS so it can be
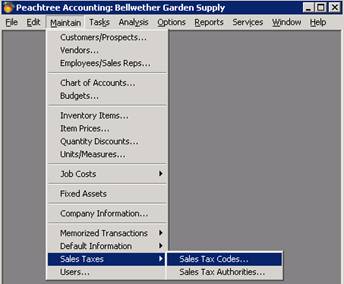
used at the Point Of 1. Click on Maintain>>
Sales Taxes>> Sales Tax Codes
2. In the Sales
Tax Code field enter POS TAX 3. Select the
taxing authorities that you would like to use to charge tax with at the Point
Of 4. Click Save
Important:
Peachtree is cap sensitive. It is important that the Tax Code name is created
using all caps and that the name is POS TAX. 3.
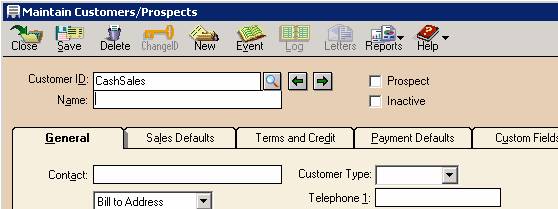
Create a
CashSales Customer All transactions processed at the
Point Of 1.
In Peachtree, select Maintain>>
Customers/Prospects
2.
Enter CashSales in the customer
ID field (the name must be exactly
CashSales. No space, C and S capitalized).
3.
Click Save and
close this window. No more information is required. 4.
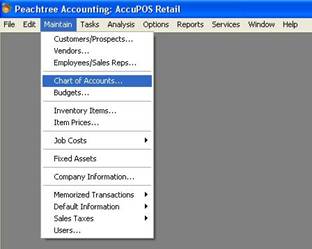
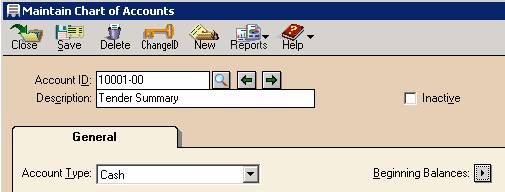
Setup a “Tender Summary ” account The Tender Summary account enables
AccuPOS Retail to split the tendering totals coming from the Point Of Sale at
the end of the shift when Peachtree is updated with the sales information. 1.
In Peachtree, click on Maintain>> Chart of
Accounts.
2.
Assign an Account ID (Example: 95000). 3.
In the Description type "Tender
Summary". 4.
Choose “Cash”
From Account Type.
5.
Click Save. At
the end of each day this account should be used as an audit trail account.
The account balance should remain
$0.00. Every day after Peachtree is updated by the Point Of Sale, you
should check the balance of this account. If this account has a Zero balance
that means that everything posted correctly. If this account is either
positive or negative, you must contact your Dealer or Attitude POSitive
support team immediately. PART 2 ACCUPOS RETAIL SETUP 5.
Install
AccuPOS Retail If you have a CD, place it in the CD drive
and select to install AccuPOS Retail. If you downloaded from the web, double
click on the file (accuposretail.exe) and it will walk you through the
installation. During the installation you will be
prompted to select if you would like to install Management, Point Of Sale, or
both. If you will be using AccuPOS Retail on a single computer choose to
install both. If you have a network, choose to install only Management on the
Back Office computer and only Point Of Sale on the front computers (the ones
that will act as the cash registers). In either case you will start setup in
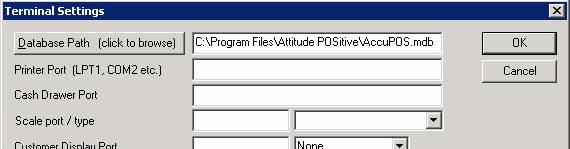
management. 6.
Set database
path Single station setup – If you
intend on using AccuPOS POS and Management on one computer, follow these
steps. 1.
Using management click on System, Setup 2.
Click on Database Path 3.
Browse to C:\Program Files\Attitude POSitive 4.
Highlight AccuPOS and click Open 5.
Click OK Multiple stations setup – If you
intend on using AccuPOS on multiple computers (multi user serial number
required) follow these steps. 1.
Create a folder called POS Data on the Server or the back
office computer that would act as the server 2.
Share the POS Data folder and set the permission to allow
network users full control 3.
Copy AccuPOS.mdb from C:\Program Files\Attitude POSitive\
to the POS Data folder. 6.
Using management click on System, Setup 7.
Click on Database Path 8.
Browse to the folder you shared (example \\Server\POS
Data\) 9.
Highlight AccuPOS and click Open 4.
Click OK AccuPOS
Retail support staff does not support creating networks and sharing folders.
Please consult with your network administrator for all network issues.
7.
Register
AccuPOS Retail (skip if evaluating) When you first install AccuPOS
Retail, it will default to demo mode. It may be used for evaluation purposes only. Using a
non-registered copy of AccuPOS Retail in a retail store is illegal. Attitude
POSitive name and address will appear on all receipts; it will not print Bar
Codes and will expire 15 days from the day it was first installed. You must
have a serial number to be able to register AccuPOS Retail. Uninstalling and
reinstalling AccuPOS Retail for the purpose of extending the evaluation
period will not work. To
register your copy of AccuPOS Retail, follow these steps: 1. From the Setup Menu in Management select Company Information 2. Click on the
Register button. 3. Enter the
company name and address the way you would like it to print on the receipt
(P.O. Boxes are not allowed, you must use the store's physical address). Enter the serial number that was
provided when you purchased AccuPOS Retail (you will find it in the DVD
case).
If the computer management is
installed on has internet connection, click on Register On Line. If you do not have internet
connection click on Register by fax, print the form, sign it and fax it to NOTE: Make sure the company name and
address entered is correct. This information will print on your receipts you
will hand customers. 8.
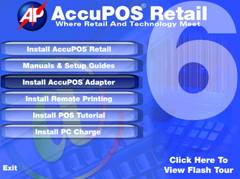
Install the
Peachtree Adapter Insert the AccuPOS CD, once the
splash screen comes up select the ‘Install AccuPOS Adapter’ and follow the
prompt. If you downloaded AccuPOS, the
adapter installs automatically, there is no need to install it separately.
9.
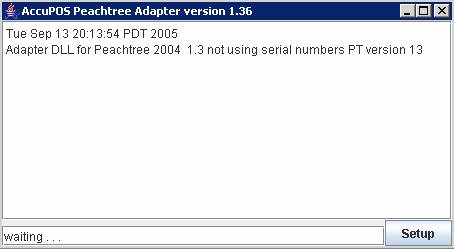
Setup the
Peachtree adapter The Peachtree Adapter is the program
that enables AccuPOS to exchange information with Peachtree. It should remain
open at all times. Closing it will disable AccuPOS from communicating with
Peachtree. The Peachtree adapter must be
installed on the same computer that the Peachtree program is installed on.
The Peachtree database files do not necessarily need to be on the same
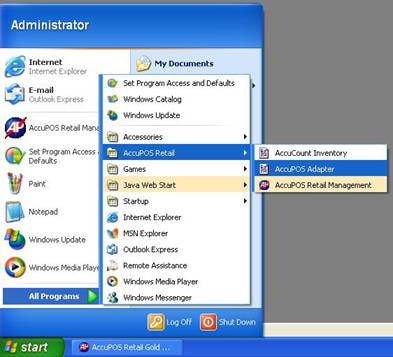
computer. 1.
Click Start>>
Programs>> AccuPOS Retail>> AccuPOS Adapter
2.
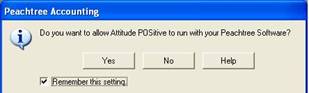
Once the Adapter will start, Peachtree will open up and
will ask, “Do you want to allow Attitude POSitive to run with your Peachtree
Software?”
3.
Check the “Remember this setting” box and then click YES.
4.
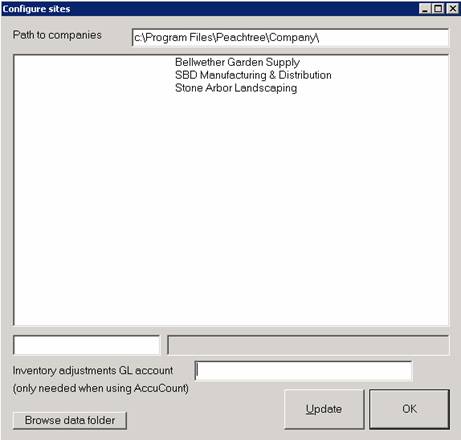
On your Windows Task Bar at the bottom of the screen, a
button will appear that says “Configure Sites” Click the button.
5.
Select the Peachtree company file
that AccuPOS will be communicating with and click Update. 6.
Click OK. 10. Import inventory from Peachtree The item list must be created and
imported from Peachtree first. For help on how to create items in Peachtree,
refer to the Peachtree help file and the ‘Setup item lists in Peachtree’
provided with AccuPOS. Every time
you make changes to existing items or create new ones, you need
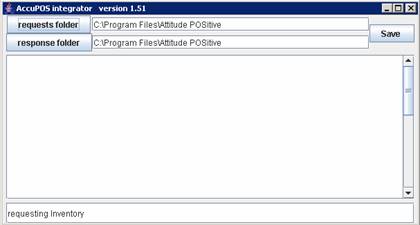
to follow these steps to update the Point Of Sale. 1. From the
File menu, select Import from Accounting 2. Leave the
Select files to import at Inventory 3. Click OK
The AccuPOS integrator will appear
and wait for the Adapter to extract the item list from Peachtree. Once the
item list is extracted, the Integrator will insert the list to the AccuPOS
database and disappear.
Important: As mentioned earlier, the Adapter must be running at
all times for AccuPOS to communicate with Peachtree. If the integrator does
not start counting items and disappears within minutes, check the Peachtree
Adapter and make sure no errors appear. Note: If you plan on tracking customers at the Point Of 11. Setup Sales Tax Authority 1.
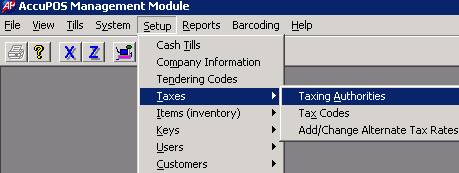
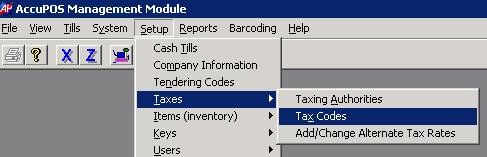
From the
Setup Menu select, Taxes, Taxing Authorities.
2.
Enter the
same Tax ID, description, GL Account and Rate that was assigned to the tax
authority in Peachtree. 3.
Click Add, to
save.
Repeat this step to create
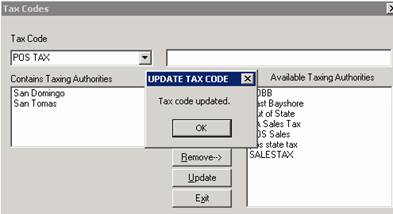
as many Tax Authorities as you created in Peachtree. 12. Setup Sales Tax Code
Select the tax authority you created
from the list of Available Taxing Authorities (the right hand column), and
move them to Contains Taxing Authority (the left hand column).
Remember: Taxing
Authorities that will be used by AccuPOS should be in Containing Taxing
Authority. The Tax Code should be named and contain the exact taxing
authorities as in Peachtree.
13. Define Tender Summary account
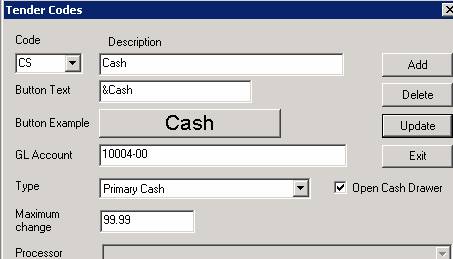
14. Define GL Accounts for Tendering
Codes Tendering totals from the Point Of
Sale will post to user defined GL accounts in Peachtree. We recommend posting
tender types that are alike to the same GL account, so they can be easily
identified in Peachtree for deposit purposes. For example, Cash and Checks should
post to the same account, Visa and Master Card to a Visa Master Card account,
American Express to AMEX account etc. At the end of each day, a General Journal
Entry can be made out of the tendering GL Accounts, to the bank account in
one lump sum. Doing so will enable to imitate the way the deposits are made
in real life, and will make the reconciliation process easier.
15. Test the integration You are done setting the integration
between AccuPOS and Peachtree, but before you put AccuPOS to work it is
strongly recommended that you test to make sure you have not missed a step.
You are
done! You may now start using AccuPOS Retail Point Of Other
recommended guides Peachtree
end of day procedures guide Point
Of Sale Operation Guide AccuPOS
on screen keys setup guide |